Flutterで複数選択されたオブジェクトをforeachで個々に非同期処理をしたい際にちょっとはまったのでメモ
実際のコード
  Future<void> hogeHoge() async {
    await Future.forEach(this.hogeIdList, (hogeId) async {
      // 非同期で行いたい処理
      await this.hoge(hogeId);
    });
    notifyListeners();
  }
参考
Flutterで複数選択されたオブジェクトをforeachで個々に非同期処理をしたい際にちょっとはまったのでメモ
実際のコード
Future<void> hogeHoge() async { await Future.forEach(this.hogeIdList, (hogeId) async { // 非同期で行いたい処理 await this.hoge(hogeId); }); notifyListeners(); }
参考
class MyHomePage extends StatefulWidget {
  const MyHomePage({Key? key, required this.title}) : super(key: key);

  final String title;

  @override
  State<MyHomePage> createState() => _MyHomePageState();
}
class _MyHomePageState extends State<MyHomePage> {
  int _counter = 0;

  void _incrementCounter() {
    setState(() {
      _counter++;
    });
  }

  @override
  Widget build(BuildContext context) {
    return Scaffold(
      appBar: AppBar(
        title: Text(widget.title),
      ),
      body: Center(
        child: Column(
          mainAxisAlignment: MainAxisAlignment.center,
          children: <Widget>[
            const Text(
              'You have pushed the button this many times:',
            ),
            Text(
              '$_counter',
              style: Theme.of(context).textTheme.headline4,
            ),
          ],
        ),
      ),
      floatingActionButton: FloatingActionButton(
        onPressed: _incrementCounter,
        tooltip: 'Increment',
        child: const Icon(Icons.add),
      ),
    );
  }
}
import 'package:flutter/material.dart';

void main() {
  runApp(const MyApp());
}

class MyApp extends StatelessWidget {
  const MyApp({Key? key}) : super(key: key);

  @override
  Widget build(BuildContext context) {
    return MaterialApp(
      title: 'Flutter Demo',
      theme: ThemeData(
        primarySwatch: Colors.blue,
      ),
      home: const MyHomePage(title: 'Flutter Demo Home Page'),
    );
  }
}

class MyHomePage extends StatefulWidget {
  const MyHomePage({Key? key, required this.title}) : super(key: key);

  final String title;

  @override
  State<MyHomePage> createState() => _MyHomePageState();
}

class _MyHomePageState extends State<MyHomePage> {
  int _counter = 0;

  void _incrementCounter() {
    setState(() {
      _counter++;
    });
  }

  @override
  Widget build(BuildContext context) {
    return Scaffold(
      appBar: AppBar(
        title: Text(widget.title),
      ),
      body: Center(
        child: Column(
          mainAxisAlignment: MainAxisAlignment.center,
          children: <Widget>[
            const Text(
              'You have pushed the button this many times:',
            ),
            Text(
              '$_counter',
              style: Theme.of(context).textTheme.headline4,
            ),
          ],
        ),
      ),
      floatingActionButton: FloatingActionButton(
        onPressed: _incrementCounter,
        tooltip: 'Increment',
        child: const Icon(Icons.add),
      ),
    );
  }
}
Flutterの環境構築は必要なものが少し多くて、ややこしいのでまとめておこうと思います。 Windows版です。


Applicationを選択

ディレクトリを選択して、プロジェクト名を入力します


{
  name: 'AAA',
  order: 1,
  folderId: 'id'
}
実際のコード
DropdownButton作成
DropdownButton<String>(
  value: model.selectFolderId,
  hint: Text('フォルダ'),
  icon: const Icon(Icons.arrow_downward),
  elevation: 16,
  style: const TextStyle(color: Colors.deepPurple),
  underline: Container(
  height: 2,
  color: Colors.deepPurpleAccent,
  ),
  onChanged: (String newValue) {
    model.setFolderId(newValue);
  },
  items: _getDropdownMenuItemList(this.folderList)
)
表示メニューを返す関数
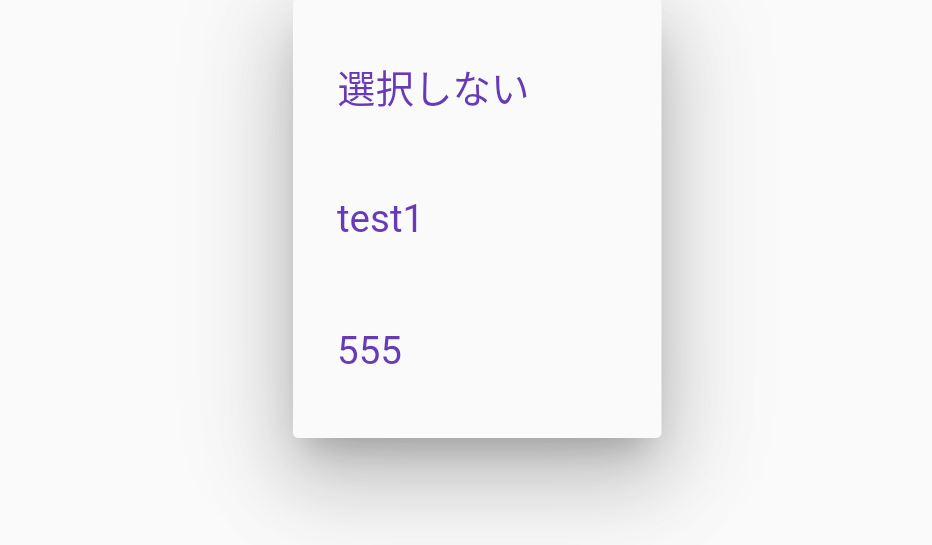
List<DropdownMenuItem<String>> _getDropdownMenuItemList(folderList) {
  var dropdownList = <DropdownMenuItem<String>>[];
  dropdownList
      .add(new DropdownMenuItem<String>(value: '', child: Text('選択しない')));
  if (model.folderList != null && folderList.length > 0) {
    for (var folder in folderList) {
      dropdownList.add(new DropdownMenuItem<String>(
          value: folder.folderId, child: Text(folder.name)));
    }
  }
  return dropdownList.toList();
}
ドロップダウンのリストに表示するのはnameで、選択されたときに格納する値はfolderIdを指定する。
provider側で最新のフォルダリストを取得し、DropdownButtonのitemsにリストを表示する。
DropdownMenuItemを別関数からList<DropdownMenuItem

main.dart
class MyApp extends StatelessWidget {
  @override
  Widget build(BuildContext context) {
    return MaterialApp(
      theme: createTheme(),
      debugShowCheckedModeBanner: false,
      home: SignUpPage(),
    );
  }
}
import 'package:flutter/material.dart';

ThemeData createTheme() {
  return ThemeData(
    primarySwatch: Colors.blue,
  );
}
import 'package:flutter/material.dart';

class ThemeColors {
  static const baseColor = const Color(0xFF222831);
  static const accentColor = const Color(0xFFFD7013);
  static const subColor = const Color(0xFF393E46);
  static const textColor = const Color(0xFFEEEEEE);
}
Flutterでのダイアログ表示には、showDialogメソッドを使用します。
複数個所で呼び出す必要があったため、別ファイルにメソッドとして切り出して使用しています。
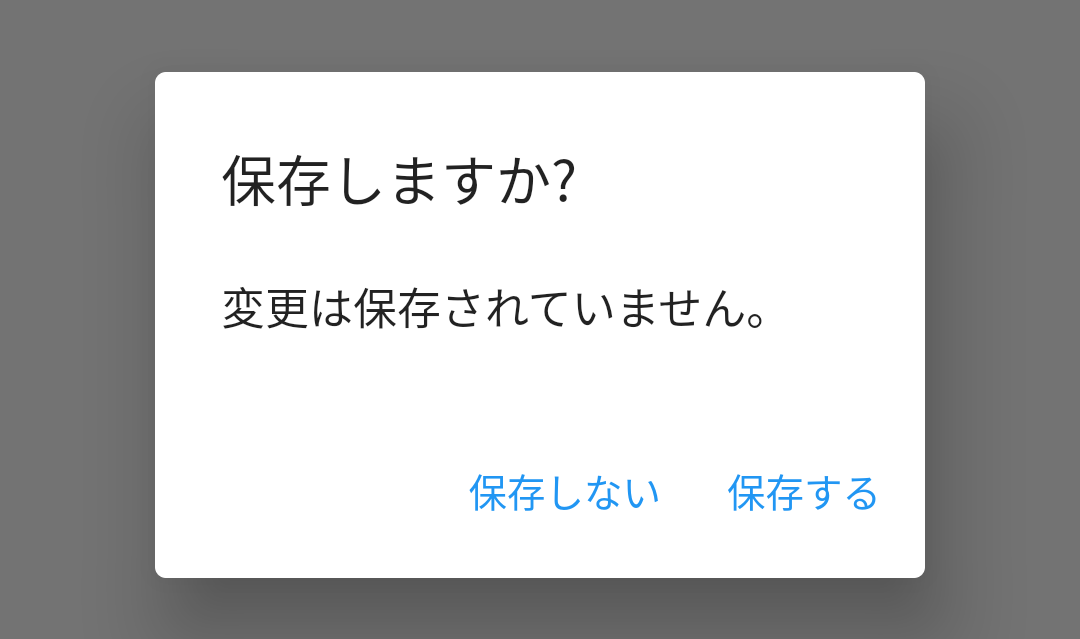
Future<bool> showCommonDialog(BuildContext context, String title,
    String message, String yesText, String noText) async {
  return await showDialog(
      context: context,
      builder: (BuildContext context) {
        return WillPopScope(
            onWillPop: () async => false,
            child: AlertDialog(
              title: Text('$title'),
              content: Text('$message'),
              actions: <Widget>[
                TextButton(
                  onPressed: () {
                    Navigator.pop(context, false);
                  },
                  child: Text(noText),
                ),
                TextButton(
                  onPressed: () {
                    Navigator.pop(context, true);
                  },
                  child: Text(yesText),
                ),
              ],
            ));
      });
}
呼び出し元
onPressed: () async {
  var result = await showCommonDialog(
        context, '保存しますか?', '変更は保存されていません。', '保存する', '保存しない');
  if (result) {
    // 「はい」選択時の処理
  } else {
    // 「いいえ」選択時の処理
  }
},
子要素の数が変更される場合があるなら、ListView.builderを使ったほうがいい
公式サンプルコード
ListView(
  padding: const EdgeInsets.all(8),
  children: <Widget>[
    Container(
      height: 50,
      color: Colors.amber[600],
      child: const Center(child: Text('Entry A')),
    ),
    Container(
      height: 50,
      color: Colors.amber[500],
      child: const Center(child: Text('Entry B')),
    ),
    Container(
      height: 50,
      color: Colors.amber[100],
      child: const Center(child: Text('Entry C')),
    ),
  ],
)
itemBuilderの指定は必須
公式サンプルコード
final List<String> entries = <String>['A', 'B', 'C'];
final List<int> colorCodes = <int>[600, 500, 100];

ListView.builder(
  padding: const EdgeInsets.all(8),
  itemCount: entries.length,
  itemBuilder: (BuildContext context, int index) {
    return Container(
      height: 50,
      color: Colors.amber[colorCodes[index]],
      child: Center(child: Text('Entry ${entries[index]}')),
    );
  }
);